There are various End of Shift functions that can be configured.
To skip to a specific section within this page, click on one of the following links:
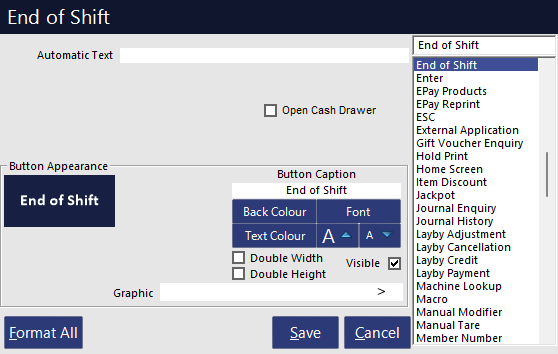
The End of Shift function is programmed onto a button anywhere on the POS Screen.
Go to Setup > POS Screen > Layouts > Buttons > End of Shift > Select to “Open Cash Drawer” if required > Save.
It is possible to perform the End of Shift on a remote terminal.
This can be used when using Pocket Pad v2 to count the amounts in the mobile float.
Enter the POS Terminal number in the Automatic Text field to create a permanent function for the remote POS only, or, simply press the POS Terminal number before selecting End of Shift.
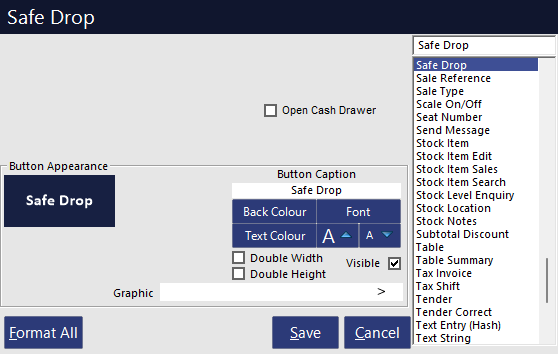
This function allows you to remove cash from the drawer to keep in the safe.
This is usually done in high turnover environments where excess cash can become a liability and a target.
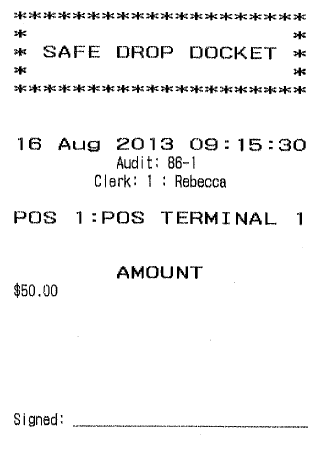
The cash can be removed from the drawer, and the receipt printer will print 2 receipts, 1 to go with the cash to the safe, the other to stay in the drawer to add to the End of Shift.
Go to Setup > POS Screen > POS Screen Setup > Layouts > Buttons > Safe Drop.
For each of these settings go to Setup > Yes/No Options.
Most installations leave their cash drawers open and unlocked when not trading.
If the cash drawer is closed, this function will allow the drawer to be opened when the clerk enters all denominations in the drawer.
It is a good idea to leave your cash drawers open and empty overnight, as this will stop any would-be thieves from breaking the cash drawer only to find it empty anyway.
If an End of Shift has been performed, a Float Entry will need to be performed on the selected terminals before a sale is able to be performed.
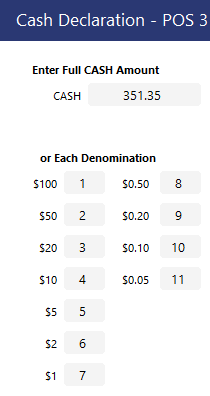
You can enter the quantity of each denomination or just the total amount.
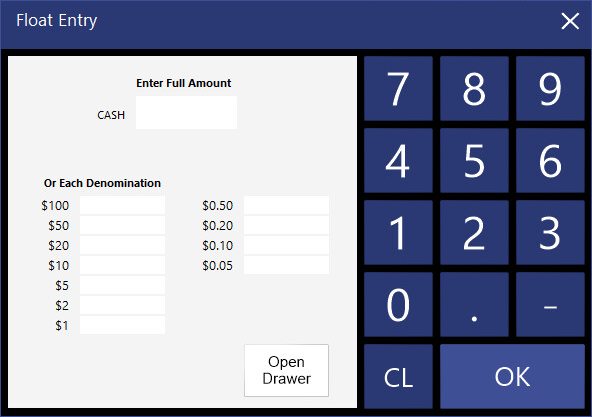
Press ‘OK’ to save the float and ‘Yes’ to confirm.
Select this option when staff counting the denominations in the drawer is not safe at the terminal, and is done in the back room or office.
The Cash Declaration will then need to be entered into the POS the next time the clerk logs in, or they can edit the Cash Declaration.

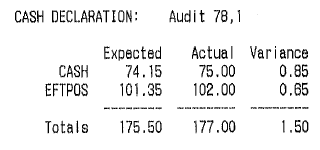
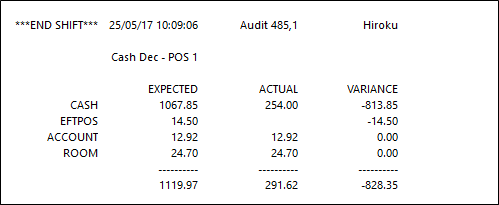
When performing an End of Shift function, the totals expected are for the sales that have been processed using the selected Clerks log on.
This does not accumulate sales across multiple terminals.
This function will ensure that the staff never knows if they have counted their drawer above or below the required amount for sales totals.
It will keep the staff honest as they don’t know what figure the drawer is supposed to add to, and will make them take more ownership of the cash procedures.
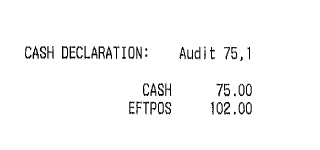
This option will also affect the Journal Enquiry display.
The example on the left will show all details, while the example on the right has this option selected and will only show the counted amounts.
Once an End of Shift function has been performed, the POS will require a clerk to log on before any sales can be processed.
This can be used to ensure the employee logs on, keeps security on the POS and prevents mistakes.
Select this function to stop the Clerk from entering any values into the Cash Declaration screen.
This can be used for the purposes of someone else counting the drawer at a later time.

Enabling this option will print the Department Sales on the End of Shift Report as well as the Banking Report.
The total for each Department will be included for the duration of the banking report or for the duration of the shift.
This option will ensure that each Bar Tab and Table has been finalised and paid for before an End of Shift function can be used.
This will help to have all payments outstanding accounted for when performing cash up procedures.
There may be a large amount of clerks that use a terminal each shift.
When an End of Shift function is performed, all Fast Clerk Buttons are cleared and the next shift can be assigned.
It is possible to force the End of Shift function on a remote terminal.
This can be used when performing sales through the Handheld using Handheld Sales, or just to simply perform the function on a remote terminal.
Selecting this option will inhibit the function from being able to be performed.

This option can only be used if you are centralising your numbers through the use of the POS Server.
You must have the POS Server correctly configured for this option to work.
Generally you would only have this option turned on, on the terminal that is always last to perform an End of Shift.
Order Numbers are centralised through the POSServer settings in Global Options > Miscellaneous > POSServer.
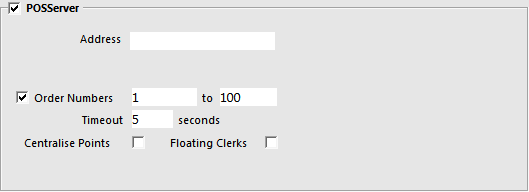
These are set per POS Terminal and need to be set individually.
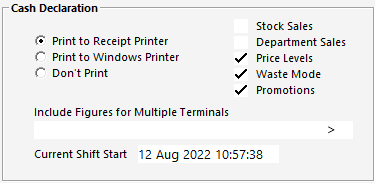
Go to Setup > POS Terminals > Modify > Miscellaneous > Cash Declaration.
Print to Receipt Printer - Selecting this will force the End of Shift to print to the Default Receipt Printer.
Print to Windows Printer - Selecting this will force the End of Shift to print to the default Windows Printer.
Don’t Print - Selecting this will not print any details of the End of Shift.
Stock Sales - When this option is enabled, the Cash Declaration will print a listing of all Stock Items that were sold during the clerk's shift. Depending on the number of Stock Items sold during the shift, this can increase the length of the report significantly.
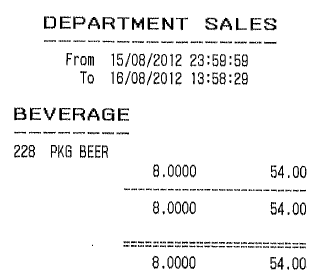
Department Sales - When this option is enabled, the Cash Declaration will include a list of all the Departments from which Stock Items were sold during the clerk's shift.
Included in the Department Sales section is the quantity of items sold from each Department, as well as the total sales amount for each Department.
Price Levels - When this option is enabled, the Cash Declaration will include a list of all the Price Levels that were used during the clerk's shift, the quantity of items that were sold using each Price Level, and the total sales amount of each Price Level.
Waste Mode - When this option is enabled, the Cash Declaration will include a list of all the Waste Mode transactions that took place during the clerk's shift, including the Stock Items and quantities that were written off/wasted.
Promotions - When this option is enabled, the Cash Declaration will include a list of all the Promotions that were triggered and applied to sales during the clerk's shift.
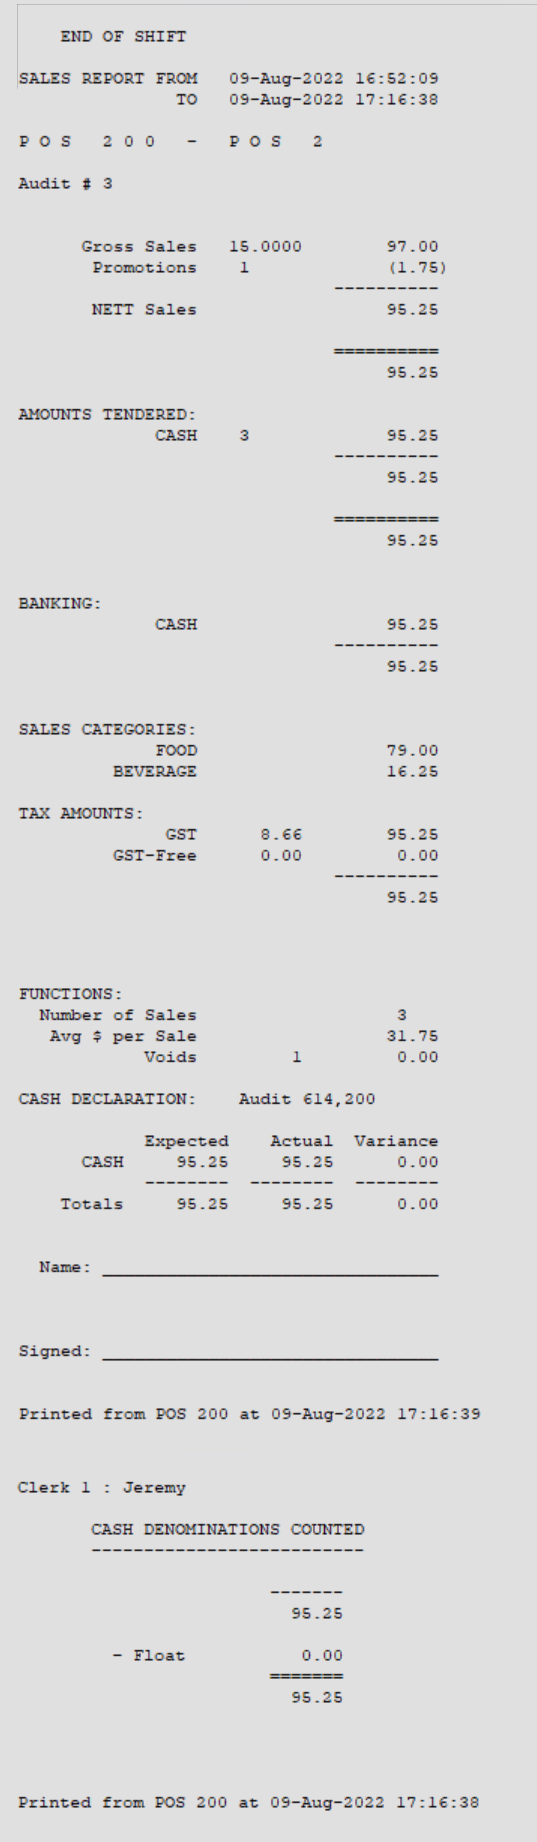
Click here to see an example End of Shift/Cash Declaration Docket when all sections are enabled
Click here to see an example End of Shift/Cash Declaration Docket when all sections are disabled
Include Figures for Multiple Terminals - Before configuring this function, we recommend that you finalise any shifts currently in progress via the End of Shift function.
When this field is populated with POS Terminal Codes, the sales figures from those POS Terminals will be included on this POS Terminal's End of Shift Cash Declaration.
This means that the Clerk which performs an End of Shift on this POS Terminal will need to count the cash from all POS Terminal Codes (that are entered in this field), and they'll need to enter those counted amounts into the End of Shift/Cash Declaration screen on this terminal.
When configuring this option, ensure that you include this POS Terminal's Code along with the other POS Terminal Codes that you want included on this Terminal's End of Shift Cash Declaration.
When this option is populated with POS Terminal Codes, those POS Terminals will lose the ability to perform End of Shift (performing an End of Shift on this terminal will essentially end the shift on all POS terminal codes that are entered in this field).
It should be noted that POS Terminal Codes entered into the Multiple POS Terminal list for Cash Declarations cannot overlap with other POS Terminals.
E.g. Each POS Terminal has the capability of configuring a Multiple POS Terminal list for Cash Declarations.
Once a POS Terminal has been added to a POS Terminal’s Multiple POS Terminal list for Cash Declarations, it cannot be entered into any other POS Terminal’s Multiple POS Terminal list for Cash Declarations.
Finally, it is important to note that when performing an End of Shift with this option configured, ensure that all packets from the other terminals have been received and processed by this terminal.
Note that this function is NOT compatible with these Yes/No Options (these options must be disabled).
- Employee to Choose Drawer when logging in
- Delay Cash Declaration Count
- Inhibit ability to End Shift on Different POS (this Yes/No Option must be disabled on the POS Terminal(s) that are including other POS Terminal's figures)
Current Shift Start - This field will contain the Date and Time that the current shift commenced on this POS Terminal. The Date and Time shown in this field can also be modified if required.
Note!
Setting the Current Shift Start will have no effect when using the Yes/No Option "Do Cash Declarations for Each Clerk".
The cash denominations shown on the Cash Declaration Screen can be customised via a User-Defined Option.
This is useful in cases where a custom denomination is introduced in a region and that denomination is required on the Cash Declaration Screen.
To configure this function, go to: Back Office > Setup > POS Terminals > Select the POS Terminal which the custom denominations are being configured > Modify > POS Settings tab > User-Defined Options.
Within the User-Defined Options, create a separate User-Defined Option for each of the required denominations.
In the below, x refers to the slot number which is being replaced with the custom denomination and yyy refers to the custom denomination amount.
Description: CASHDECDENOMINATIONx
Setting: yyy
The below screenshot shows the slot numbers for each denomination (e.g. $100 is slot 1, $50 is slot 2 and so on).
To set a custom denomination for the desired slot, enter the required slot number when creating the User-Defined Option (see further below for an example).
Note!
There are 11 denomination slots when using the Australian region.
The number of denomination slots and the default denominations displayed in those slots will vary by region.
E.g. When selecting UK as the region, an additional 12th and 13th slot will appear on the right-hand side column of denominations.
Simply enter the 12th or 13th slot number when configuring the User-Defined option as per the instructions below.
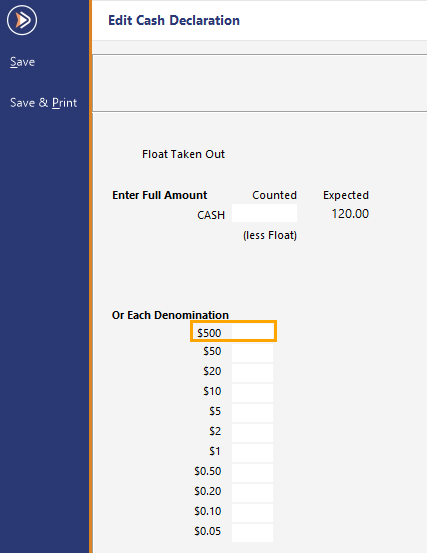
E.g. If a value of $500 is required in slot 1, then the User-Defined setting will need to be created as follows:
Description: CASHDECDENOMINATION1
Setting: 500
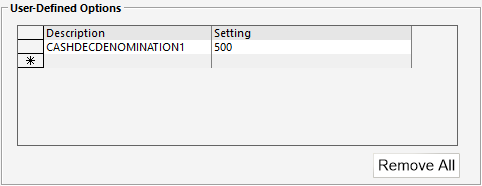
This will result in a denomination of $500 appearing in the first slot (below the "or Each Denomination" heading) as shown below.
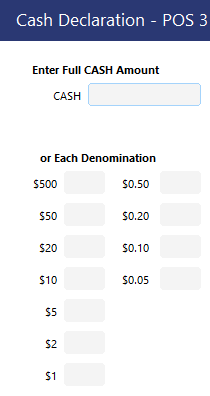
If required, Custom Denominations can be configured for every slot; simply create a separate User-Defined option for each slot as per the above steps/User-Defined Setting format.
Any Custom Denomination amounts will also appear in the Edit Cash Declaration window which is accessible via Back Office > Utilities > Edit Cash Declaration > Select Cash Declaration from the right-hand side list > Edit.
This option enables the Clerk to act as the till, rather than using the till at the POS Terminal. The Clerk can then login to any POS Terminal using their Clerk Code and perform sales, placing any takings into their apron/pocket.
Once their shift is finished, they can perform an End of Shift on any POS Terminal at the venue, and in the Cash Declaration screen, they will enter the CASH takings from all the POS Terminals they used during their shift.
The End of Shift Docket/Report will then display all the sales performed by the Clerk, the actual cash amount they entered, along with the expected cash amount and any variance.
When configuring this option, the Yes/No Options must be configured as follows:
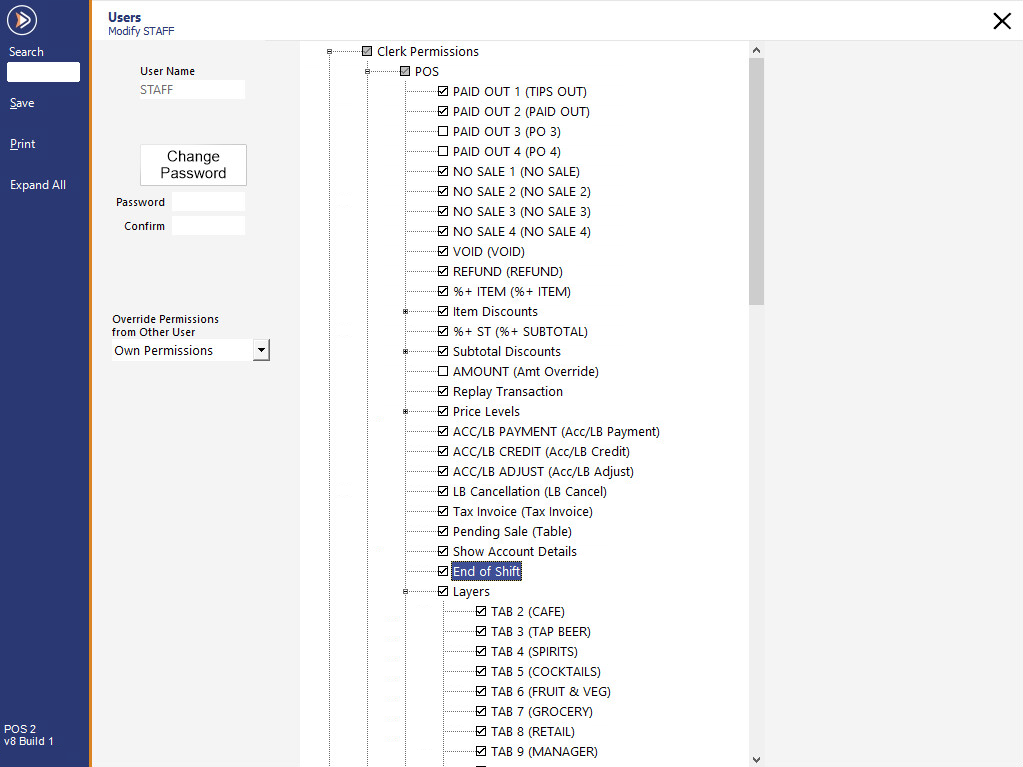
Go to Setup > Users > Select User (Other than Admin) > Modify > Clerk Permissions > POS > End of Shift.
Keep in mind that, although the user has access to the End of Shift function, if the button is not programmed on a tab they have access to, they will still not be able to use it.
User Permission on viewing of End of Shift values in Journal Enquiry
Any User or Clerk that is linked to the User can be limited in being able to view the values of the Cash Declaration.
Go to Setup > Users > Modify > Clerk Permissions > POS > Journal Enquiry > View End of Shift.
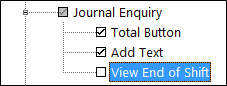
It’s important to note that this setting does not limit the staff member from being able to perform an End of Shift.
Staff can be limited from seeing values on the End of Shift using Yes/No Option - End of Shift Docket Only Shows Counted Amounts.

When a clerk or user tries to view the End of Shift in the Journal Enquiry through the POS screen the values will be hidden.
If the User has not been limited from viewing the Journal Enquiry through the Enquiry menu on the Back Office however, they will be able to see the values there.

A clerk not linked to the User limiting the permissions will see the values as normal.